Uniproxy Feed
Spire Uniproxy Feed provides AIS data in NM4 format. All individual data sources will be masked in the live data stream.
For the NMEA data, there are several Tag Block prefixes attached to the messages. Here is an explanation:
\s:66,c:1537884961*36\<NMEA_MESSAGE>
\g:1-2-1889,s:66,c:1537884964*43\<NMEA_MESSAGE>
\g:2-2-1889*55\<NMEA_MESSAGE>
The specific tags identified below have the following meanings:
• s – The source. Should always be 66. All of our individual data sources are masked. We mask the sources with 66.
• c – Timestamp of the message in seconds since 1970-01-01T00:00:00Z (unix epoch time)
• g – Group code, only found on multi-sentence messages. The first value is the sentence number (starting at 1), the second is the total number of sentences, and the third is an identifier for the message (all sentences for one message should have the same value)
UniProxy installation instructions
- Download the GateHouse UniProxy package v1.7.3
- Extract the files included in the package using the password
G@t3H0us3p@ss - Save the JSON file that was sent to you via email by Spire Maritime’s support team to an easily accessible location on your local workstation.
- If system is running a Linux OS but is NOT Debian based, please ensure that Docker and docker-compose are installed.
- Install the UniProxy:
- Windows: use the
uniproxy_v.1.7.3.exepackage - Debian: use the
uniproxy_1.7.3-2202_amd64.debpackage - Docker: use the
docker_uniproxy_v1.7.3.tar.gzcontainer (refer to thereadme_docker.txtfile included in the setup package)
- Windows: use the
- Verify local OS firewall is either disabled or allows local / inbound connections via TCP
1240and8085 - On your network firewall ensure that outbound TCP ports
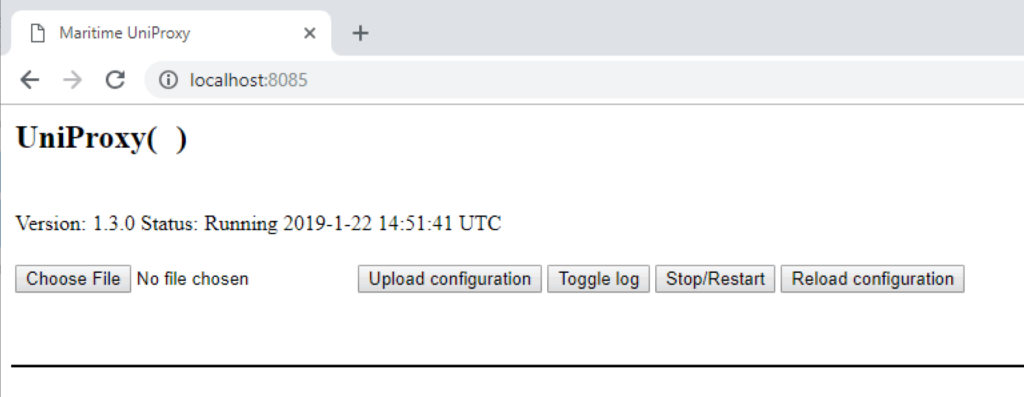
8750and9750(for UniProxy connection to exactEarth servers) and TCP25500and35500(for initial authentication of UniProxy client) are open and outbound to IP209.226.70.74 - Once install is complete open a browser and direct it to the host where UniProxy is on port 8085 (i.e. http://localhost:8085 or http://machine-hostname:8085)
- You will be presented with a screen similar to the following (version will be different):
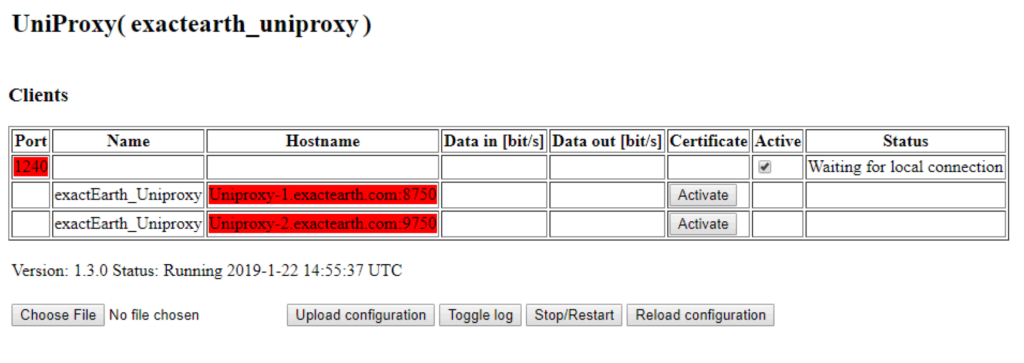
- Click the ‘Choose File’ button to select the JSON file that was sent to you via email by Spire Maritime’s support team and saved earlier in this setup guide.
- Click the ‘Upload configuration’ button
- You should now be presented with a new screen similar to the following (version will be different):
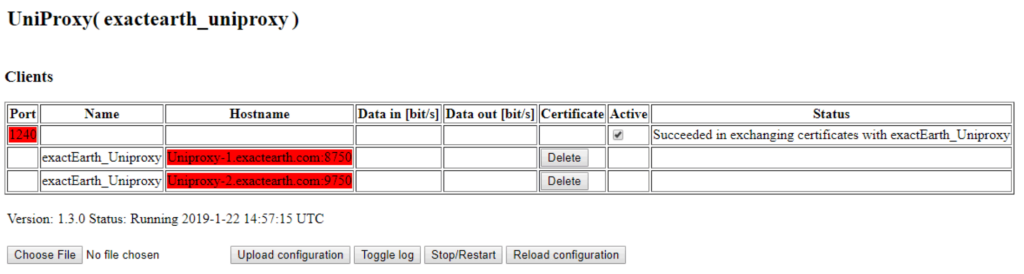
- Click on the Activate button for either of the listed Hostnames
NOTE: This should only be done after receiving instructions from Spire Maritime’s support team stating your account is ready for activation and must be completed within 7 Days of Spire Maritime activating your account on our servers. - You should now be presented with a screen like is shown below (Note that the buttons under ‘Certificate’ have changed to say ‘Delete’):
- You may now connect your AIS message ingestion software of choice to the UniProxy client. Please direct the software to connect to the workstation on which you’ve installed the UniProxy via TCP port
1240. - You can also simply
telnetto port1240or usencatto listen to port1240in order to test that the connection is working and data is flowing - Once you’ve connected your software to the UniProxy client you should see something similar to this screen:
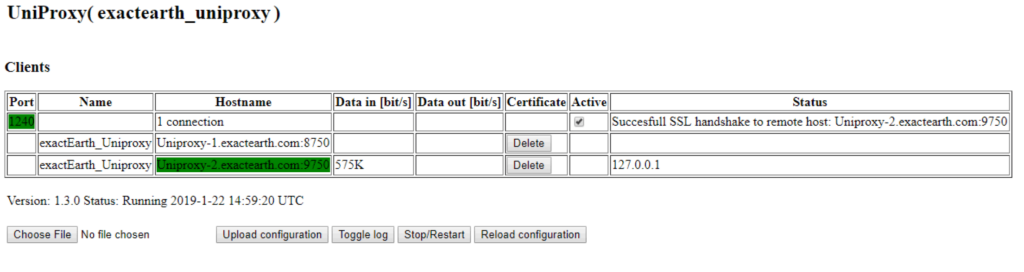
- Your AIS ingestion software should now or soon will begin to receive our AIS data stream.
NOTE: Please ensure your system sets the installed UniProxy service to start automatically on system boot.